
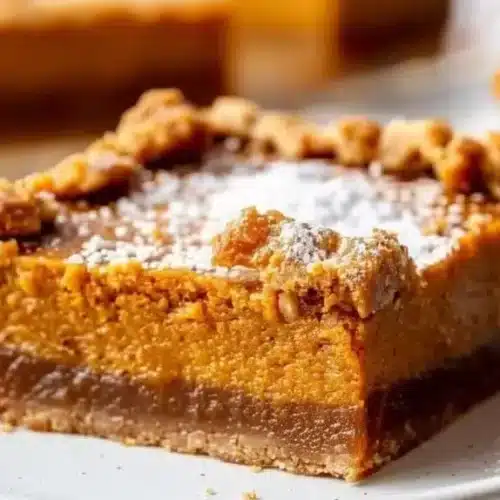
Dairy-Free Pumpkin Pie Bars Recipe: A Sweet Delight
Nothing says autumn quite like the sweet, spiced aroma of pumpkin pie wafting through the home. But what if I told you that you could enjoy that warm, comforting flavor without the dairy? Introducing Dairy-Free Pumpkin Pie Bars! These delectable treats are creamy, spiced, and have a delightful crust that will remind you of traditional pumpkin pie – minus the fuss. Perfect for gatherings, holidays, or a simple family dessert, this recipe puts a healthy spin on a classic favorite. Get ready to dive into everything you need to know about making these delicious bars that are sure to please everyone, whether they’re dairy-free or not!
Why You’ll Love These Dairy-Free Pumpkin Pie Bars
There are countless reasons to fall in love with this recipe. Here are some key benefits that make these Pumpkin Pie Bars a must-try:
-
Quick and Easy: With straightforward steps and minimal ingredients, these bars can be whipped up in just over an hour, making them a fantastic choice for busy weeknights or last-minute guests.
-
Perfect for Beginners: If you’re new to baking or have limited experience, this recipe is designed to be foolproof. You’ll impress friends and family with your baking skills, even if you just started!
-
Ideal for the Whole Family: These bars not only cater to those who are dairy-free but also satisfy the craving of anyone who loves pumpkin pie. They’re a hit with kids and adults alike!
-
Economical: Most of the ingredients are common pantry staples, which means you won’t have to break the bank to whip up a batch.
-
Customizable: Whether you want to add some nuts, swap ingredients, or play with the spices, this recipe is flexible to fit your taste preferences.
The Necessary Ingredients
Before diving into the baking process, let’s gather all the necessary ingredients. With just a handful of items, you will have everything you need for these scrumptious bars:
- 1 1/2 cups all-purpose flour
- 1/2 cup powdered sugar
- 1/2 cup dairy-free butter
- 1 cup pumpkin puree
- 3/4 cup coconut milk
- 3/4 cup maple syrup
- 2 teaspoons pumpkin pie spice
- 1/4 teaspoon salt
- 1 teaspoon vanilla extract
- 2 tablespoons cornstarch
Notes and Substitutions on Ingredients:
-
Pumpkin Puree: This gives the bars their signature pumpkin flavor. If you can’t find canned pumpkin puree, you can easily make your own by baking and blending fresh pumpkin.
-
Dairy-Free Butter: This ingredient replaces traditional butter while keeping the bars creamy. You could also use coconut oil or vegan butter as substitutes for similar results.
-
Coconut Milk: This versatile ingredient adds creaminess and a slight coconut flavor. If you prefer, almond milk or oat milk can be used, but keep in mind the texture may vary slightly.
How to Prepare the Dairy-Free Pumpkin Pie Bars Step by Step
Now that we have everything we need, let’s get started on making our delicious bars! Follow these detailed steps for guaranteed pumpkin perfection.
-
Preheat the oven to 350°F (175°C) and grease an 8×8 inch baking pan.
Preheating ensures that your dessert bakes evenly. Greasing the pan helps prevent the bars from sticking, making them easy to cut after baking.
Pro Tip: Use parchment paper to line the pan for even easier removal! -
In a medium bowl, mix the flour and powdered sugar, then cut in the dairy-free butter until the mixture resembles coarse crumbs.
Mixing the dry ingredients and slowly incorporating the butter gives your crust a delicious crumbly texture. Don’t worry about making it perfect; just aim for a fine crumb consistency.
Pro Tip: Use a pastry cutter or your fingers to mix in the butter for best results. -
Press the mixture into the bottom of the prepared baking pan to create a crust. Bake for 15 minutes.
Press firmly to create an even layer; this will form a nice base for your filling. Baking it beforehand gives your crust a lovely golden color and prevents it from becoming soggy.
Pro Tip: Use the bottom of a measuring cup to press it flat and even. -
In a separate bowl, combine the pumpkin puree, coconut milk, maple syrup, pumpkin pie spice, salt, vanilla extract, and cornstarch. Whisk until smooth.
Whisking these ingredients together creates a creamy filling that’s bursting with flavor. Ensure there are no lumps from the cornstarch, which will help thicken your bars perfectly.
Pro Tip: If your mixture seems too thick, add a splash more coconut milk to loosen it up. -
Pour the pumpkin mixture over the baked crust.
This luscious filling will bake into the crust, creating a delightful combination of flavors and textures. Be sure to spread it evenly for even cooking.
Pro Tip: Tap the pan slightly on the counter to release any air bubbles. -
Return to the oven and bake for an additional 25-30 minutes, or until set.
You want the filling to be firm to the touch but still slightly jiggly in the center. It will continue to set as it cools.
Pro Tip: Start checking for doneness at the 25-minute mark to avoid overbaking. -
Allow to cool completely before cutting into bars. Serve and enjoy!
Letting the bars cool fully is key to achieving clean cuts. They can be served warm or chilled, depending on your preference.
Pro Tip: For even cleaner slices, refrigerate the bars for about an hour before cutting.

Serving Suggestions
How you serve your Dairy-Free Pumpkin Pie Bars can elevate the experience even further. Here are some creative ideas:
Perfect Pairings:
- Drinks: Pair these scrumptious bars with a warm cup of chai tea, spiced apple cider, or even a rich black coffee for a delightful flavor combination.
- Toppings: Top with dairy-free whipped cream or coconut yogurt and sprinkle some cinnamon or crushed pecans for added texture and flavor.
Occasions:
- Weeknight Dinner: These bars make a great dessert option after a comforting fall or winter meal.
- Special Occasion Meals: Serve these delightful bars at Thanksgiving or Friendsgiving to wow your guests with a dairy-free alternative.
Serving Tips:
- Consider cutting the bars into small squares for easy serving, especially at gatherings.
- Drizzle a bit of maple syrup on top for an extra touch of sweetness.
Storage and Reheating Tips
To keep your Dairy-Free Pumpkin Pie Bars fresh and delicious, follow these storage guidelines:
Refrigerated:
- Duration: These bars will stay fresh for up to one week in the refrigerator.
- Type of Container: Store in an airtight container to prevent them from drying out or absorbing other odors.
Freezed:
- If possible: Yes, you can freeze these bars for longer storage.
- Packaging: Wrap them individually in plastic wrap and place in a freezer-safe container or zip-top bag.
- Defrosting: To thaw, simply leave them in the refrigerator overnight or let them sit out at room temperature for about an hour before serving.
Reheating:
- Best Method: To enjoy them warm, microwave individual servings for about 10-15 seconds or warm them in a preheated oven at 350°F (175°C) for roughly 5-10 minutes.
Guaranteed Success Tips
- Don’t Overmix the Filling: Too much mixing can incorporate air and lead to cracks in the filling. Mix just until combined.
- Thoroughly Grease the Pan: To easily remove the bars, proper greasing or using parchment is essential.
- Tightly Pack the Crust: Press the crust mixture firmly into the pan so it holds together during baking.
- Cool Completely: Allowing the bars to cool fully is crucial for achieving the perfect texture.
- Check for Doneness: Oven temperatures can vary; always check a few minutes before the recommended time to prevent overbaking.
Recipe Variations
If you’re feeling adventurous, here are some variations to try:
- Add Chocolate: For a bit of a twist, fold in dairy-free chocolate chips before pouring the filling onto the crust.
- Nutty Crust: Substitute half of the all-purpose flour with finely ground almonds or oats for a more nutrient-dense crust.
- Spicy Version: Add 1 teaspoon of cayenne or black pepper for a spicy kick to balance the sweetness.
Frequently Asked Questions (FAQ)
Q: Can I use a different type of flour?
A: Yes, you can substitute with almond flour or coconut flour. However, keep in mind that the texture may vary, and you might need to adjust the quantity.
Q: My bars are too runny, what did I do wrong?
A: This can happen if the filling isn’t baked long enough or if it wasn’t whisked well enough with the cornstarch. Make sure to bake until the edges are set and the center has a slight jiggle.
Q: Can I make this recipe vegan?
A: This recipe is already dairy-free, but make sure to check the butter and other ingredient labels to ensure they’re vegan-friendly.
Q: How do I know when my bars are done baking?
A: You want to look for a slightly firm texture in the center, with only a little jiggle. A toothpick inserted should come out mostly clean.
Q: Can I prepare the filling in advance?
A: Yes, you can prepare the filling a day ahead, store it in the refrigerator, and then bake it when you’re ready.
Q: What’s the best way to cut the bars?
A: Use a sharp knife and wipe it clean between each cut for cleaner edges.
Q: Can I use fresh pumpkin instead of canned?
A: Absolutely! Just make sure to cook and puree the pumpkin before using it in the recipe.
By following this guide to making Dairy-Free Pumpkin Pie Bars, you’ll not only enjoy these delightful treats but also impress your friends and family with your culinary skills. Happy baking!
Dairy-Free Pumpkin Pie Bars
Ingredients
For the crust
- 1.5 cups all-purpose flour
- 0.5 cups powdered sugar
- 0.5 cups dairy-free butter Can substitute with coconut oil or vegan butter.
For the filling
- 1 cup pumpkin puree Can use homemade if canned is unavailable.
- 0.75 cups coconut milk Can substitute with almond milk or oat milk.
- 0.75 cups maple syrup
- 2 teaspoons pumpkin pie spice
- 0.25 teaspoons salt
- 1 teaspoons vanilla extract
- 2 tablespoons cornstarch
Instructions
Preparation
- Preheat the oven to 350°F (175°C) and grease an 8x8 inch baking pan.
- In a medium bowl, mix the flour and powdered sugar, then cut in the dairy-free butter until the mixture resembles coarse crumbs.
- Press the mixture into the bottom of the prepared baking pan to create a crust. Bake for 15 minutes.
- In a separate bowl, combine the pumpkin puree, coconut milk, maple syrup, pumpkin pie spice, salt, vanilla extract, and cornstarch. Whisk until smooth.
- Pour the pumpkin mixture over the baked crust.
- Return to the oven and bake for an additional 25-30 minutes, or until set.
- Allow to cool completely before cutting into bars. Serve and enjoy!