
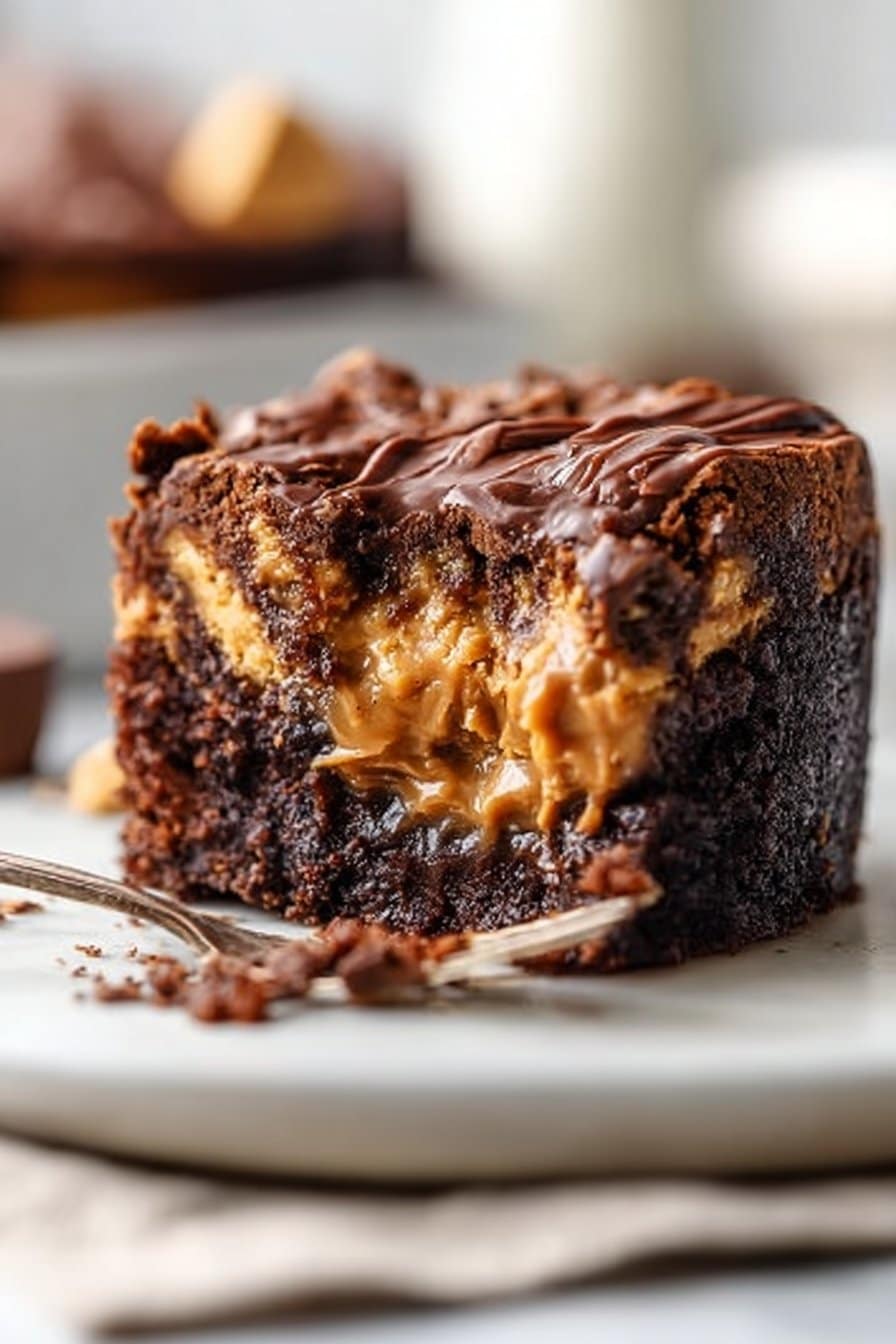
Who doesn’t love a dessert that combines chocolate and peanut butter? Introducing the Reese’s Chocolate Peanut Butter Cup Earthquake Cake — a mouthwatering creation that’s rich, gooey, and undeniably delicious! This loaf of goodness boasts a soft chocolate base, a creamy peanut butter concoction that provides delightful surprise pockets, and is topped with chunks of mini Reese’s peanut butter cups for an extra dash of fun. As the name suggests, it’s a cake that has personality, with its cracked top and melty chocolate goodness. In this blog post, I’m going to share not just the recipe, but also tips, variations, and everything you need to know to create this irresistible earthy delight in your kitchen.
Why You’ll Love This Reese’s Chocolate Peanut Butter Cup Earthquake Cake
Get ready to indulge! This cake is perfect for any occasion, and here’s why:
- Quick and Easy: Utilizing a box cake mix means minimal prep time. You can whip this up in just about an hour!
- Perfect for Beginners: No advanced baking skills required! This recipe is straightforward and guaranteed to impress.
- Ideal for the Whole Family: With its delightful combination of flavors, it’s a hit among kids and adults alike.
- Economical: Made with simple ingredients, this cake is cost-effective for any budget.
- Decadent Dessert: The chocolate-peanut butter combination creates a sweet harmony of flavors and textures that’s hard to resist.
The Necessary Ingredients
Before you tie on your apron, let’s gather the ingredients you’ll need for this heavenly dessert.
- 1 box chocolate cake mix
- 3 large eggs
- 1/2 cup vegetable oil or melted butter
- 1 cup water or milk
- 1/2 cup creamy peanut butter
- 8 oz cream cheese, softened
- 1 1/2 cups powdered sugar
- 1 teaspoon vanilla extract
- 1/2 cup chocolate chips
- 1 cup mini Reese’s peanut butter cups, chopped
Notes and Substitutions on Ingredients:
- Chocolate Cake Mix: This is the base of your cake, providing moistness and a deep chocolate flavor. If you prefer homemade, you can substitute it with your favorite chocolate cake recipe, but you might need to adjust bake times.
- Cream Cheese: Essential for adding creaminess and stability to the peanut butter filling. You can replace it with Greek yogurt for a tangy flavor, or vegan cream cheese for a dairy-free version.
How to Prepare the Reese’s Chocolate Peanut Butter Cup Earthquake Cake step by step
Let’s get baking! Follow these steps for a flawless cake.
- Preheat your oven and prepare your pan
Preheat your oven to 350°F (175°C) and grease a 9×13-inch baking pan. Greasing helps prevent your cake from sticking, allowing for easy removal when it’s time to serve.
Pro Tip: Use parchment paper in addition to greasing for an easy lift-out. - Prepare the cake batter
Following the package instructions, mix together the chocolate cake mix, eggs, vegetable oil (or melted butter), and water (or milk). Aim for a smooth batter, mixing until just combined.
Pro Tip: Do not overmix! This helps retain the cake’s tenderness. - Pour the batter into the prepared pan
Once the batter is ready, pour it into the greased pan and smooth the top to ensure an even bake.
Pro Tip: Gently tap the pan against the counter to eliminate any air bubbles. - Make the peanut butter cheesecake mixture
In a separate mixing bowl, beat the softened cream cheese, creamy peanut butter, powdered sugar, and vanilla extract until smooth and creamy. This mixture adds rich flavor and a delightful texture.
Pro Tip: Make sure your cream cheese is softened to room temperature for easy mixing. - Drop spoonfuls of cheesecake mixture over the batter
Using a spoon, drop dollops of the peanut butter cheesecake mixture over the chocolate batter. Avoid spreading it, as the uneven distribution will create the “earthquake” effect during baking.
Pro Tip: Leave some of the cake batter visible for an aesthetically pleasing look when it rises. - Sprinkle on the toppings
Sprinkle chocolate chips and chopped mini Reese’s peanut butter cups generously over the top of the cheesecake layer. This adds texture and bursts of flavor.
Pro Tip: Use a variety of chocolate chips (dark, semi-sweet, or milk) for different flavor profiles. - Bake your cake
Place the baking pan in the preheated oven and bake for 35–40 minutes, or until the top is cracked, but the center remains slightly soft. This ensures a fudgy texture.
Pro Tip: Check your cake with a toothpick; it should come out with moist crumbs, not wet batter. - Cool and serve
After baking, let the cake cool for about 15–20 minutes before slicing. It’s best when warm, as the chocolate and peanut butter are still melty!
Pro Tip: If you can resist, let it cool completely to enjoy the texture contrast with the crunchy toppings.
Serving Suggestions
Once you’ve baked the perfect Reese’s Chocolate Peanut Butter Cup Earthquake Cake, it’s time to enjoy it! Here are some creative serving ideas:
Perfect Pairings
- Hot Chocolate or Coffee: The rich cake balances beautifully with a warm beverage.
- Vanilla Ice Cream: Serve a warm slice with a scoop of vanilla ice cream for that delightful hot-and-cold effect.
Occasions
- Family Gatherings: A perfect treat for potlucks or birthday celebrations.
- Casual Weeknight Dessert: An easy-to-whip dessert for a cozy family night, perfect for satisfying that sweet tooth.
Serving Tips
- Garnish: Drizzle with melted chocolate or a sprinkle of sea salt for added presentation.
- Warm It Up: Microwave individual pieces for around 10-15 seconds for the ultimate experience – gooey and warm!
Storage and Reheating Tips
If you happen to have any leftovers (though it’s unlikely), here’s how to store your cake to keep it fresh:
Refrigerated:
- Duration: Store in an airtight container for up to 5 days.
- Type of container: Make sure to choose a sealed container to prevent it from drying out.
Freezed:
- Duration: Wrap slices tightly in plastic wrap and store in a freezer bag for up to 3 months.
- Defrosting: Move to the refrigerator overnight before serving or microwave on low power for a quick defrost.
Reheating:
- Best method: For the best texture, use the oven at 350°F (175°C) for about 10 minutes or microwave for 10-15 seconds as needed.
Guaranteed Success Tips
To ensure your cake turns out perfectly every time, keep these golden rules in mind:
- Don’t overmix the batter: Just mix enough to incorporate the flour to ensure a soft texture.
- Use room temperature ingredients: This helps create a smoother batter and lighter cake.
- Check your oven temperature: An oven thermometer can help you ensure it’s not too hot or cold, affecting baking time.
- Let it cool before slicing: This allows flavors to develop and structure to set.
Recipe Variations
Here are some fun twists to this classic cake:
- For a spicy version: Add 1 teaspoon of cayenne pepper to the cake batter for a sweet and spicy kick.
- For a vegan version: Replace the eggs with flax eggs (1 tablespoon ground flaxseed mixed with 3 tablespoons water per egg) and use a plant-based cream cheese alternative.
- For a festive edition: Mix in seasonal edible decorations, such as crushed candy canes during the holidays.
Frequently Asked Questions (FAQ)
Q: Can I use a gluten-free cake mix?
Yes! A gluten-free chocolate cake mix can be substituted without altering the remaining ingredients.
Q: My cake came out completely dry, what did I do wrong?
You may have overbaked the cake. Make sure to check for doneness at the 35-minute mark and remove the cake when it has a slight jiggle in the middle.
Q: How can I make it less sweet?
Consider reducing the amount of powdered sugar in the peanut butter and cream cheese mixture. You can also use dark chocolate chips which are less sweet.
Q: Can I prepare this cake ahead of time?
Absolutely! You can bake the cake a day in advance and store it in the refrigerator. Just heat it before serving to revive its fudginess.
Q: Is this cake safe for those with nut allergies?
No, this cake contains peanut butter and Reese’s cups, which include peanuts. It’s advisable to avoid serving it to anyone with nut allergies.
Q: How should I serve leftovers?
Reheating your cake in the microwave for a few seconds is a popular choice, but you can also enjoy it cold or at room temperature, as flavors tend to deepen.
Q: What’s the best way to slice this cake?
Using a serrated knife for the best clean cuts, particularly if the cake is still a bit warm to prevent it from crumbling.
Now that you have all the tips and tricks, it’s time to roll up your sleeves and get baking! Your kitchen is about to smell fantastic, and your taste buds will thank you for trying this Reese’s Chocolate Peanut Butter Cup Earthquake Cake. So, gather your ingredients, and let the delicious fun begin!

Reese’s Chocolate Peanut Butter Cup Earthquake Cake
Ingredients
Cake Base
- 1 box chocolate cake mix This is the base of your cake, providing moistness and a deep chocolate flavor.
- 3 large eggs
- 1/2 cup vegetable oil or melted butter
- 1 cup water or milk
Peanut Butter Cheesecake Mixture
- 1/2 cup creamy peanut butter
- 8 oz cream cheese, softened Essential for adding creaminess and stability to the peanut butter filling.
- 1 1/2 cups powdered sugar
- 1 teaspoon vanilla extract
Toppings
- 1/2 cup chocolate chips
- 1 cup mini Reese’s peanut butter cups, chopped
Instructions
Preparation
- Preheat your oven to 350°F (175°C) and grease a 9×13-inch baking pan.
- In a mixing bowl, combine the chocolate cake mix, eggs, vegetable oil (or melted butter), and water (or milk). Mix until just combined.
- Pour the batter into the prepared pan and smooth the top.
- In a separate bowl, beat the cream cheese, peanut butter, powdered sugar, and vanilla extract until smooth.
Assembly
- Drop spoonfuls of the peanut butter cheesecake mixture over the cake batter without spreading.
- Sprinkle chocolate chips and chopped mini Reese’s peanut butter cups on top.
Baking
- Bake in the preheated oven for 35–40 minutes, or until the top is cracked but the center remains slightly soft.
- Let the cake cool for 15–20 minutes before slicing.