
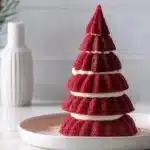
Red Velvet 3D Christmas Tree
The festive season is upon us, and what better way to celebrate the holidays than with a stunning Red Velvet 3D Christmas Tree? With its vibrant hue, moist texture, and rich flavor, this cake is not only a feast for the taste buds but also a visual delight for the eye. Each slice offers a delightful mix of cocoa and vanilla, finished with a luscious buttercream that melts in your mouth. This isn’t just another cake; it’s a centerpiece that will have your family and friends talking long after the last crumb has been devoured. In this article, we’ll guide you through creating this charming dessert step by step, ensuring your holiday celebrations will be sweeter than ever.
Why You’ll Love This Red Velvet 3D Christmas Tree
This 3D Christmas Tree isn’t just beautiful; it’s also a fantastic addition to any holiday gathering. Here are a few reasons why you’ll absolutely love it:
- Quick and Easy: With straightforward steps, this recipe is perfect for bakers of all levels, even if you’re short on time!
- Perfect for Beginners: If you’re new to baking, this cake will build your confidence as it’s hard to make mistakes.
- Ideal for the Whole Family: Kids and adults alike will enjoy the fun and festive look of this cake, making it a hit at any gathering.
- Customizable: The flavor and decoration of the tree can be modified to fit your preferences or dietary needs.
- Economical: With common ingredients, this cake is budget-friendly while delivering impressive results.
The Necessary Ingredients
Before you start baking, let’s gather the required ingredients to whip up this beautiful cake. Here’s what you’ll need:
- 3 1/4 cups all-purpose flour
- 1 1/4 teaspoons baking soda
- 1/2 teaspoon salt
- 2 tablespoons unsweetened natural cocoa powder
- 3/4 cup unsalted butter (softened)
- 2 cups granulated sugar
- 1/4 cup canola or avocado oil
- 3 large eggs
- 2 teaspoons vanilla extract
- 1 tbsp red food coloring (optional)
- 1 1/4 cup buttermilk
- 1 tablespoon white or apple cider vinegar
- 2 cups unsalted butter (softened)
- 5 to 6 cups confectioners’ sugar
- 2 teaspoons pure vanilla extract
- 3 to 4 tablespoons milk
Notes and Substitutions on Ingredients
-
Buttermilk: This ingredient helps create that signature tender crumb in your cake. If you don’t have buttermilk, you can make your own by adding a tablespoon of vinegar or lemon juice to a cup of milk and letting it sit for about 5 minutes.
-
Food Coloring: The red food coloring gives the cake its classic holiday look. If you prefer a natural alternative, you can use beet juice or omit it entirely for a chocolate cake. Just keep in mind it won’t have the vibrant red hue.
-
Unsalted Butter: Using unsalted butter allows you to control the salt content in your recipe. If you’re out of unsalted butter, you can substitute it with salted butter—just omit any additional salt from the recipe.
How to Prepare the Red Velvet 3D Christmas Tree Step by Step
Now that you have all your ingredients prepared, let’s get started on making this delicious Red Velvet 3D Christmas Tree. Follow these steps closely for success!
Step 1: Preheat the Oven
-
Preheat your oven to 350°F (175°C). This ensures that your cake will bake evenly once you place it in.
Pro Tip: Make sure your oven is fully preheated before putting the cake in. This helps the cake rise properly.
Step 2: Prepare the Cake Batter
-
In a large bowl, combine the flour, baking soda, salt, and cocoa powder. Whisk these together until well mixed.
Pro Tip: Sifting the dry ingredients can help avoid lumps and provide a smoother batter.
-
In another bowl, cream together the softened unsalted butter and granulated sugar until the mixture is pale and fluffy.
Pro Tip: This step is crucial as creaming aerates the butter, resulting in a lighter cake texture.
-
Add the oil, eggs, vanilla extract, and red food coloring (if using) into the butter-sugar mixture. Mix until well combined.
Pro Tip: Always add the eggs one at a time to ensure a smooth batter without overmixing.
-
In a separate measuring cup, mix the buttermilk with the vinegar. Gradually add this mixture to the butter and sugar blend, alternating with the flour mixture. Start and end with the flour.
Pro Tip: Mixing in parts helps maintain the structure of the batter.
Step 3: Bake the Cake
-
Divide the batter into greased cake pans (three or more, depending on your mold). Use a 3D Christmas tree mold if you have one; otherwise, you can shape it as desired.
Pro Tip: Tap the pans gently on the counter to release any air bubbles for a smoother top.
-
Bake in the preheated oven for 25-30 minutes or until a toothpick inserted in the center comes out clean.
Pro Tip: Keep an eye on your cakes as every oven is different; start checking for doneness a few minutes early.
Step 4: Make the Whipped Vanilla Buttercream
-
While the cakes cool, prepare the buttercream. Beat the softened unsalted butter until creamy, then gradually add the confectioners’ sugar, mixing until combined.
Pro Tip: Start mixing on low speed to prevent a sugar cloud, then increase to medium-high.
-
Add the pure vanilla extract and 2-3 tablespoons of milk until you reach your desired consistency. Whip it on high speed for 2-3 minutes until fluffy.
Pro Tip: Adjust the milk based on the thickness you’re aiming for—thicker for spreading, thinner for piping.
Step 5: Assemble the Tree
- Once the cakes have cooled completely, use a serrated knife to level the tops if necessary. Start stacking the cakes, beginning with the largest base.
Pro Tip: Spread a layer of buttercream between each cake for added moisture and flavor.
- Use the remaining buttercream to cover the entire tree, smoothing it out. You can create a textured look to mimic a frosted tree if you like.
Pro Tip: Use a spatula or knife to create swirls for a more festive appearance.
- Finally, decorate with festive sprinkles or fondant decorations to complete your tree.
Pro Tip: Consider using edible glitter to add a magical touch!
Serving Suggestions
Bring your Red Velvet 3D Christmas Tree to life with these serving ideas:
Perfect Pairings
- Beverages: Serve with a glass of rich eggnog, spiced cider, or a classic hot chocolate.
- Desserts: Pair with creamy vanilla ice cream or homemade whipped cream for extra indulgence.
Occasions
- Festive Gatherings: Perfect for holiday parties, Christmas dinners, or family gatherings.
- Gift Giving: Slice this cake and package it into festive boxes for a sweet holiday gift.
Serving Tips
- Slice the cake into generous portions. For added flair, dust with cocoa powder right before serving for a sophisticated touch.
Storage and Reheating Tips
To preserve the quality of your Red Velvet 3D Christmas Tree, follow these storage tips:
Refrigerated
- Duration: Store leftovers in an airtight container for up to 5 days.
- Type of Container: Opt for a cake dome or a sealed Tupperware to keep the cake fresh.
Freezed
- Packaging: If you wish to freeze the cake, wrap it tightly in plastic wrap and then place it in a freezer bag. It can last for up to 3 months.
- Defrosting: To defrost, leave it in the fridge overnight and bring it to room temperature before serving.
Reheating
- Best Method: For best results, gently microwave slices for 10-15 seconds or warm in a conventional oven at low heat until just warmed.
Guaranteed Success Tips
To ensure your Red Velvet 3D Christmas Tree comes out perfectly every time, keep these golden rules in mind:
- Don’t overmix the batter: Just mix enough to incorporate the flour for a tender crumb.
- Room temperature ingredients: Ensure all your refrigerated items like eggs and buttermilk are at room temperature for the best emulsion.
- Use the right pans: For even baking, use quality bakeware and avoid overcrowding in the oven.
- Cool completely before frosting: Frosting a warm cake can lead to slip-ups, so let it cool completely.
Recipe Variations
Feel free to experiment with these fun variations of your Red Velvet 3D Christmas Tree:
- For a spiced version: Add 1 teaspoon of cinnamon and 1/2 teaspoon of nutmeg to the batter for a warm spice note.
- For a vegan version: Replace the eggs with flax eggs (1 tablespoon ground flaxseed mixed with 2.5 tablespoons water per egg) and use plant-based butter.
- For a richer chocolate flavor: Incorporate an extra tablespoon of cocoa powder into the batter for a deeper taste.
Frequently Asked Questions (FAQ)
Q: My cake came out completely dry, what did I do wrong?
A: Dry cakes often result from overmixing the batter or baking too long. Always check your cake a few minutes earlier than the recommended time and do not overmix after adding flour.
Q: Can I make this cake in advance? How do I store it?
A: Absolutely! You can bake the cake in advance and store it wrapped in plastic wrap in the fridge for up to a week, or freeze it for longer storage. Just frost it just before serving for the best taste.
Q: Is there a non-dairy substitute for buttermilk?
A: Yes, you can easily make non-dairy buttermilk by adding a tablespoon of lemon juice or vinegar to a cup of almond milk, soy milk, or any other non-dairy milk and letting it sit for 5-10 minutes.
Q: How do I adjust the sweetness of the frosting?
A: If you find the frosting too sweet, you can cut back on the confectioners’ sugar and incorporate a bit of cream cheese to balance out the flavors.
Q: Can I add flavors to my buttercream?
A: Definitely! Consider adding flavors like espresso, almond, or orange zest to the buttercream for unique twists.
Q: Is it possible to use this recipe for cupcakes?
A: Yes! This cake recipe can also be adapted for cupcakes; just reduce the baking time to about 18-20 minutes.
Q: Can I make this recipe gluten-free?
A: Yes, you can substitute all-purpose flour with a gluten-free flour blend, but results may vary slightly in texture and moisture.
Embrace the joy of baking this holiday season with your Red Velvet 3D Christmas Tree. Not only will it grace your table beautifully, but it will also create sweet memories to cherish for years to come. Happy baking!
Red Velvet 3D Christmas Tree
Ingredients
For the Cake
- 3 1/4 cups all-purpose flour
- 1 1/4 teaspoons baking soda
- 1/2 teaspoon salt
- 2 tablespoons unsweetened natural cocoa powder
- 3/4 cup unsalted butter (softened)
- 2 cups granulated sugar
- 1/4 cup canola or avocado oil
- 3 large eggs
- 2 teaspoons vanilla extract
- 1 tablespoon red food coloring (optional)
- 1 1/4 cups buttermilk Make your own buttermilk by adding 1 tbsp of vinegar to 1 cup of milk.
- 1 tablespoon white or apple cider vinegar
For the Whipped Vanilla Buttercream
- 2 cups unsalted butter (softened)
- 5 to 6 cups confectioners’ sugar
- 2 teaspoons pure vanilla extract
- 3 to 4 tablespoons milk Adjust based on the desired thickness.
Instructions
Preparation
- Preheat your oven to 350°F (175°C).
- In a large bowl, combine the flour, baking soda, salt, and cocoa powder. Whisk until well mixed.
- In another bowl, cream together softened unsalted butter and granulated sugar until pale and fluffy.
- Add the oil, eggs, vanilla extract, and red food coloring (if using) into the butter-sugar mixture. Mix until well combined.
- In a separate measuring cup, mix the buttermilk with the vinegar. Gradually add this mixture to the butter and sugar blend, alternating with the flour mixture.
Baking
- Divide the batter into greased cake pans or use a 3D Christmas tree mold.
- Bake for 25-30 minutes or until a toothpick inserted in the center comes out clean.
Making the Whipped Vanilla Buttercream
- Beat the softened unsalted butter until creamy, then gradually add the confectioners’ sugar.
- Add the vanilla extract and milk until you reach the desired consistency.
Assembling the Tree
- Once the cakes have cooled completely, level the tops if necessary and stack the cakes starting with the largest base.
- Spread a layer of buttercream between each cake, then cover the entire tree with the remaining buttercream.
- Decorate with festive sprinkles or fondant decorations.