
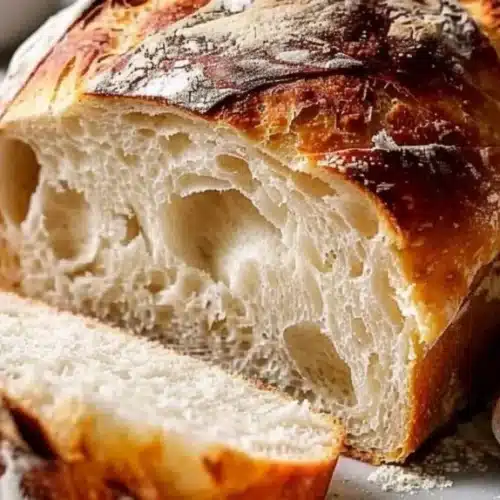
There’s something incredibly satisfying about homemade bread, isn’t there? The warm, fluffy aroma wafting through your kitchen, the soft crust giving way to a pillowy interior—it’s comfort food at its finest. Enter the No Knead Dutch Oven Sandwich Bread, a simple yet satisfying bread recipe that allows you to enjoy the joy of baking without the hassle. This recipe is perfect for busy folks who want freshly baked bread without spending hours in the kitchen. So, roll up your sleeves and get ready; this is your new go-to recipe for a foolproof and delicious loaf every time!
Why You’ll Love This No Knead Dutch Oven Sandwich Bread
This recipe is more than just another bread-making project; it has several standout features that make it a must-try for everyone, especially those new to baking. Here’s why you’ll love it:
- Quick and Easy: With minimal effort and ingredients, you can create a delightful loaf without spending hours kneading. Just mix, wait, bake, and enjoy!
- Perfect for Beginners: You don’t need to be a master baker or possess specialized skills. This straightforward method is user-friendly and virtually fool-proof.
- Ideal for the Whole Family: Whether you’re making sandwiches, toast, or simply enjoying a slice with butter, this bread is versatile enough to please everyone.
- Economical: Homemade bread is not just delicious but also budget-friendly compared to store-bought options, allowing you to enjoy high-quality bread without breaking the bank.
The Necessary Ingredients
Before you start your baking journey, let’s gather the ingredients. This basic recipe requires only a handful of pantry staples you likely already have at home!
- 3 cups all-purpose flour
- 1 1/2 teaspoons salt
- 1/2 teaspoon instant yeast
- 1 1/2 cups water
Notes and Substitutions on Ingredients:
- All-Purpose Flour: This is the base for your bread, giving it structure and texture. You can substitute it with whole wheat flour, but note that it may yield a denser loaf.
- Salt: This ingredient not only seasons your bread but also controls yeast activity. Using kosher salt? Try 2 teaspoons instead, as it’s less dense.
- Instant Yeast: This kind of yeast allows for quicker fermentation. If you only have active dry yeast on hand, it works too, but you’ll need to activate it with warm water first before adding it to your mix.
How to Prepare the No Knead Dutch Oven Sandwich Bread Step by Step
Follow these steps for a perfectly baked loaf.
- Mix the Dry Ingredients: In a large mixing bowl, combine the 3 cups of all-purpose flour, 1 1/2 teaspoons salt, and 1/2 teaspoon instant yeast. Stir until well blended. This initial step ensures the yeast is evenly distributed throughout the flour, which is crucial for proper rising.
- Pro Tip: Use a whisk to aerate the flour for a lighter texture!
- Add Water: Pour in 1 1/2 cups of water and stir with a wooden spoon or spatula until a shaggy dough forms. Ensure all the flour is incorporated; it doesn’t need to be smooth at this stage.
- Pro Tip: Use lukewarm water to provide a better environment for the yeast to do its magic.
- Let It Rest: Cover the bowl tightly with plastic wrap and let it sit at room temperature for 12-18 hours. This long resting period allows the dough to rise naturally, developing flavor and a bubbly surface.
- Pro Tip: Try to leave it in a warm spot, like on your kitchen counter, but out of any draft.
- Preheat Your Oven: When you’re ready to bake, preheat the oven to 450°F (232°C), placing your Dutch oven inside to heat up. This step is essential to create a steamy environment that helps your bread rise and form that gorgeous crust.
- Pro Tip: Preheat your Dutch oven for at least 30 minutes to ensure it’s hot enough.
- Transfer the Dough: Once the Dutch oven is hot, carefully take it out. If necessary, turn the dough out onto a floured surface and shape it into a ball. Place it in the Dutch oven (be cautious—it’s hot!).
- Pro Tip: Use a spatula or your hands to shape the dough gently to retain those lovely air bubbles.
- Bake Covered: Cover the Dutch oven and bake it for 30 minutes. The lid traps steam, helping the bread achieve a great rise and crust.
- Pro Tip: Use oven mitts—things will be steamy and hot!
- Uncover and Bake Again: After 30 minutes, remove the lid and let it bake for an additional 15-20 minutes, or until your loaf is golden brown and crusty.
- Pro Tip: If you want a darker crust, leave it in a little longer but keep an eye on it to prevent burning.
- Cool and Slice: Once the loaf is golden brown, remove it from the oven and let it cool on a wire rack for at least 30 minutes before slicing. This helps set the texture.
- Pro Tip: A serrated knife is best for slicing bread, as it won’t squish the loaf.

Serving Suggestions
What can you do with this scrumptious bread? Let’s explore some delicious and creative ways to serve your No Knead Dutch Oven Sandwich Bread!
Perfect Pairings:
- Spreadable Extras: Serve it warm with butter, whipped cream cheese, or your favorite jams for a delightful breakfast.
- Dips: Pair with olive oil and balsamic vinegar for a rustic appetizer choice or serve alongside soups and stews.
Occasions:
- Weeknight Dinner: Elevate your family meals; serve this fresh bread alongside your favorite pasta dishes or hearty salads.
- Special Occasions: Use it for an impressive cheese platter or as part of a Sunday brunch spread. You could even make a gourmet sandwich for lunch festivities.
Serving Tips:
- Make it Unique: Top your sandwiches with unusual fillings. Think avocado, smoked salmon, or grilled veggies!
- Toast It: Lightly toast slices in the oven for a crunchy base before adding toppings.
Storage and Reheating Tips
To keep your homemade No Knead Dutch Oven Sandwich Bread fresh, consider these storage and reheating tips:
Refrigerated:
- Duration: Bread can last in the fridge for about 5-7 days.
- Type of Container: Wrap the loaf in plastic wrap or foil and place it in an airtight container.
Freezed:
- If Possible: Yes, you can freeze your loaf!
- Packaging: Slice the bread before freezing for easier access. Wrap each slice in plastic wrap and place them in a freezer bag.
- Defrosting: To thaw, leave the slices at room temperature or for a quicker option, use a toaster!
Reheating:
- Best Method: Reheat slices in a toaster or in the oven at 350°F (175°C) for about 10 minutes until warm and crisp.
Guaranteed Success Tips
To ensure your No Knead Dutch Oven Sandwich Bread turns out perfectly, here are some golden rules to follow:
- Don’t rush the rising: Allow your dough the full recommended resting time to develop flavor and rise.
- Measure accurately: Use a kitchen scale if possible. Too much or too little flour can affect the texture.
- Use the right tools: A heavy-duty Dutch oven is essential for trapping steam, ensuring a nice crust while baking.
- Let it cool completely: Avoid slicing too soon, as the steam needs time to set for the ideal texture.
Recipe Variations
The beauty of this No Knead Dutch Oven Sandwich Bread recipe lies in its versatility! Here are some fun variations to try:
- Herb & Garlic: Add 1 tablespoon of dried herbs (like rosemary or thyme) and 2 minced garlic cloves to the dry ingredients for a fragrant twist.
- Cheese Lover’s Delight: Fold in 1 cup of shredded cheese (like cheddar or mozzarella) during the mixing of the dry and wet ingredients.
- Sweet Version: Mix 2 tablespoons of sugar and 1 teaspoon of cinnamon into the dry ingredients for a subtly sweet breakfast treat.
Frequently Asked Questions (FAQ)
Q: My bread came out dense; what did I do wrong?
A: The most likely culprits are not letting the dough rise long enough or using too much flour. Ensure you accurately measure flour and stick to the recommended rising times.
Q: Can I use a regular pot instead of a Dutch oven?
A: While it’s best to use a Dutch oven due to its heat retention and steam-trapping capabilities, you can use any heavy, oven-safe pot with a lid. Just be cautious of heat limits for your pots.
Q: Why is my dough so sticky?
A: Sticky dough is usually a good sign! However, if you find it difficult to handle, you can add a bit more flour until you reach a workable consistency.
Q: How can I make this bread gluten-free?
A: Substitute all-purpose flour with a 1:1 gluten-free flour blend. Keep in mind that the texture may vary slightly.
Q: Can I add seeds or nuts to the dough?
A: Yes! Feel free to mix in seeds like sunflower or sesame, or chopped nuts before the final rise. Just keep the total amount under a cup to ensure proper dough consistency.
Q: What should I do if my bread is hard after baking?
A: Bread can become hard if it’s overbaked. Make sure you check it frequently in the last few minutes of baking and remove it once it reaches a lovely golden brown.
Q: My bread doesn’t seem to rise much—what could’ve gone wrong?
A: Make sure your yeast is fresh and that the water isn’t too hot or too cold when combining. Also, a warm environment can help yeast activate better during the rising phase.
With this comprehensive guide, you’re fully equipped to make the loveliest No Knead Dutch Oven Sandwich Bread. Your kitchen will soon become the warm and inviting place for family and friends who can’t resist those freshly baked aromas. Happy baking!
No Knead Dutch Oven Sandwich Bread
Ingredients
Dry Ingredients
- 3 cups all-purpose flour Can substitute with whole wheat flour, but will yield a denser loaf.
- 1.5 teaspoons salt Use 2 teaspoons if using kosher salt.
- 0.5 teaspoon instant yeast Active dry yeast can be used if activated with warm water first.
Wet Ingredients
- 1.5 cups water Use lukewarm water for better yeast activation.
Instructions
Preparation
- In a large mixing bowl, combine all-purpose flour, salt, and instant yeast. Stir until well blended.
- Pour in water and stir with a wooden spoon until a shaggy dough forms. Ensure all the flour is incorporated.
- Cover the bowl tightly with plastic wrap and let it sit at room temperature for 12-18 hours.
Baking
- Preheat your oven to 450°F (232°C) with your Dutch oven inside for at least 30 minutes.
- Carefully transfer the dough into the hot Dutch oven, cover it, and bake for 30 minutes.
- Remove the lid and bake for an additional 15-20 minutes until the loaf is golden brown.
- Cool on a wire rack for at least 30 minutes before slicing.